Install Vortexbox And Run Off Virtualbox
Before we begin, I will do a bit of introduction on what Vortexbox software is all about. If you landed on this page because you are searching for guides on Vortexbox, most likely you know what this software is all about. However, I will still do a bit of explanation.
Vortexbox is a software version of a advance music jukebox sort of thing. It allows you to put all your songs, movies and pictures all in one computer and you can share all your content with everyone within the family. In fact, it is very versatile and it allows every single member in the family to contribute content to the Vortexbox server software. All these data can be shared to everyone or locked to certain accounts and individuals. But that will be the advanced aspect of Vortex box. In this guide, I will show you how to set up Vortexbox and use it.
Step 1
Prepare Virtualbox for Vortexbox installation
I recommend running Vortexbox off Virtualbox because having an existing Windows operating system to control and send files between the Vortexbox server makes every thing a whole lot easier. This makes your entire database of songs safe in another drive in any event the main operating system crashes or goes down. It is also easier to clone the whole drive to another drive in case the existing hard disk fails.
First run Virtualbox, click on “Settings” and “System”, change the value of the memory to 768 meg and above. Click on the “Display” category and max out the video ram to 128 meg. This is required before you can use and install Vortexbox. Next create a new hard disk. You can create a hard disk as large as you like, preferably, you can create a huge Virtualbox image out of an USB drive. Click on “New” and proceed to create a new hard disk. Take note that you can choose between a few modes like secondary master, etc. Make sure that the hard disk is set to IDE Master. Just type in a name to describe your Virtualbox hard disk. For the disk size, it is best to use fixed size then dynamic expanding for stablity. After creating the hard disk, it will show up on the left side.
You may also need to mess with the network settings of Virtualbox. Just keep swapping the network adapters and startup Vortexbox so that you eventually get an IP that works. The default for most users is “Nat”
Step 2
Installation of Vortexbox in Virtualbox
Click on the new entry that you have just created followed by “Settings” icon at the top. We will now mount the Vortexbox installation iso image.
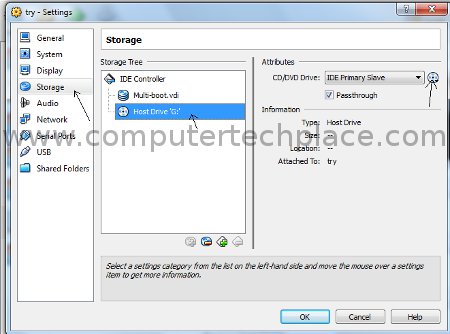
Click on “Storage”=> “Click on the CD drive” => Click on the CD icon. (Choose a Virtual CD?DVD disc file”
Navigate and select the vortexbox-2.0.iso file for example. In case you might be holding on to a newer version. Then choose whatever you have downloaded.
Assuming that you have already followed step 1 and change the ram values correctly, hit the “Start” icon (green arrow) to run the Virtualbox software. If nothing goes wrong, you should the Vortexbox installation kick start right off by itself. If it does not start up, hit F12 when the Virtualbox is just starting to load and it should show a menu for you to choose between hard disk, CD-Rom etc. Then press “C” on the keyboard to load the Vortexbox.iso image.
There are a few options, but we choose install for Vmware. Even though other options such as advance install works as well, but if I choose other options, the IP address will eventually be wrong or it simply don’t work.
The next few screens through the installation are self – explanatory, such as setting of the password, time etc. As for installing side by side or use recommended settings, I choose use all the space in the hard disk. Since this is a Virtualbox anyway. There is no need to set any considerations for an alternate operating system. Besides, a lot of guides and reviews don’t seem to point towards a possibility of running dual booting of Vortexbox and other operating systems.
After a complete installation of Vortexbox, it will reboot once. After that you can choose to remove and unmount the Vortexbox.iso CD image from the “Settings” or simply hit the F12 key when Virtualbox is starting to choose load from hard disk. Or it will keep loading the installation disc and there will be no end to the installation of Vortexbox.
Step 3
Using Vortexbox
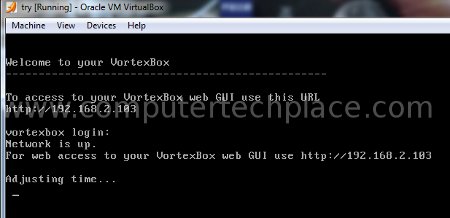
If nothing goes wrong, Vortexbox will load up all the way to just a black screen some text saying that you can access Vortexbox via an IP address. Simply key in that address into your favorite web browser and you should get to the Vortexbox user interface. There are quite a bunch of stuff in there. Generally, we are concerned with just a few major ones. But I will briefly touch on them all.
If you hover your mouse over the icons, you will be able to see the name that describes that service.
Home = This is the page where you will see some general information of your build and how much disc space you have
SqueezeBox Server = This is the main area where you will be using the most. In fact, it is the one that plays the music.
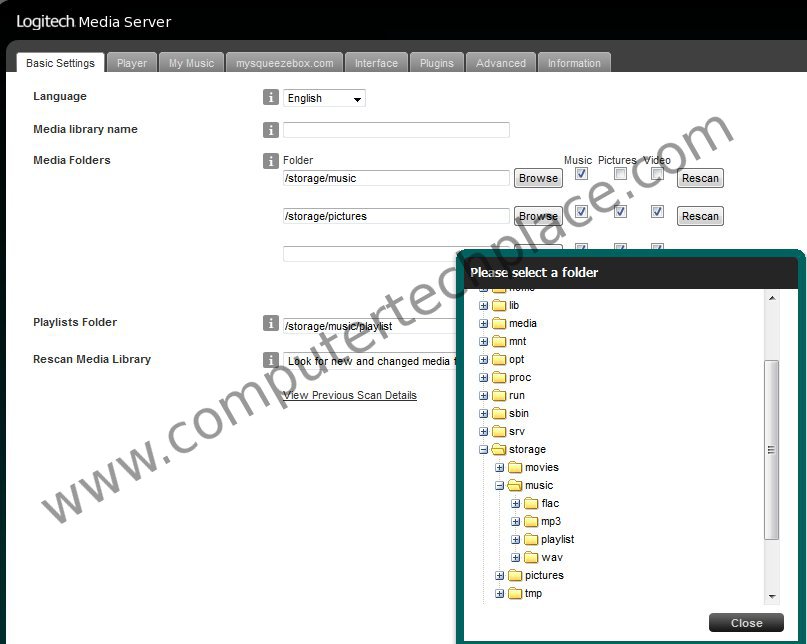
You will need to configure some settings here. Click on the “Settings” option that is hiding right at the bottom right of this whole page. Generally, you only need to configure the media folders of the “Basic Settings” page.
Add the Media Folders to where your music files are. Click on Browse \ Storage \ Music etc. If not you will never be able to find your music files in the Logitech Media Server at all.
CD/DVD ripping status = This is the place where it will automatically extract sounds out of any audio CD as long as it is inserted into your disc drive. But for me, this function is a little buggy when Vortexbox is installed in Virtualbox software. However, it works if you use it via Vmware, or maybe really install it as a whole into a real computer. But anyway, there is no need to use this function. There are a few options there. You can choose to rip either to mp4 or m2ts. Or whatever. It will rip and instantly place them into the directory before you even can say yes or no.
FLAC Mirror = FLAC is a new standard in audio format known as lossless codec. It generally means a super large sized music file that is as close as it can get to an audio CD quality except that it is a whole lot smaller compared to a file from the CD. But it is a lot larger then conventional Mp3. But again, I don’t really bother about this feature.
System Status => Nothing to do here. Just a page full of information like you are on a battleship
Network Configuration => There should be nothing to change here unless you need to enable Sonos sharing. I am not too sure about what is Sonos sharing, but the Google search says something about playing the same music in different machines at the same time. Whatever… It does not concern me.
System Configuration => You can change a few settings and services here. For instance, by default the VortexBox Player is not turned on. You can turn it on here. In case you may wish to turn off some features that you do not use at all, you can do so too. Such as the Auto CD Ripper. I do not use at all. It is good because the auto ripper keeps auto ripping everytime you insert a CD. Even if it is unable to detect the disc correctly, it may end up ripping multiple instances, and creating multiple empty folders in your Vortexbox system.
USB Backup => I really don’t know how to activate this in Vittualbox. Until I figure out how, I will include it here.
DLNA server => The defaults are generally correct. There is no need to change anything unless you have created extra folders for your content.
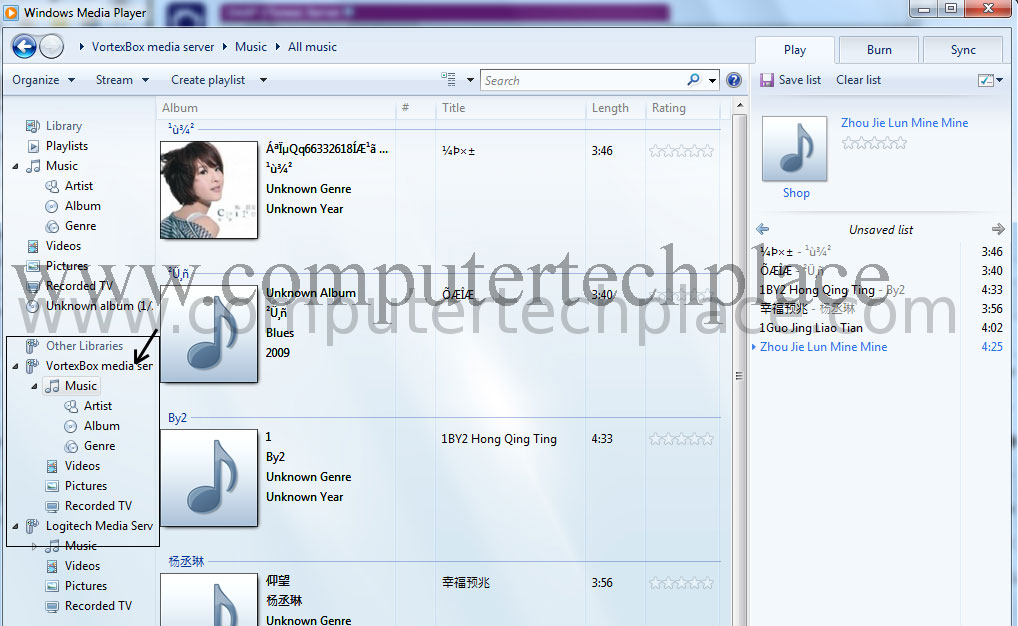
DAAP => If you enable this service, you can use DAPP compliant music players to listen to the music that you have stored in the Vortexbox. If you noticed, the description says start iTunes and Vortexbox should show up. Actually, if you use Windows 7, start the Windows Media player, and Vortexbox will show up below the “Other Libraries”
Configure VortexBox Player => There is only one option you need to tick and that is to put a box in the “Soft Vol”. This is so that you will get a volume control when you run the Squeezebox Server. Which is the second icon in the whole list of icons.
Vortexbox upgrade => Self explanatory. I suppose.
Moving music files to Vortexbox server.
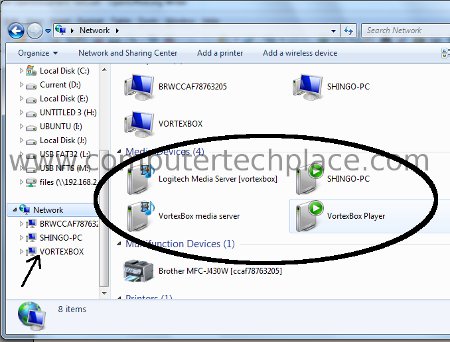
If you are lucky, once you startup Vortexbox from Virtualbox. Windows 7 itself will automatically detect and mount all the devices and drives. Which will look like this.
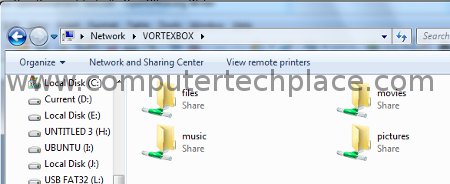
Simply click on the Vortexbox drive and you will see 4 folders.
You can only paste files into the “Files” folders. After that, the system will automatically copy the sounds over to the other folders. All these files will in turn, shown up in the Vortexbox player. If you want to delete the files, just delete from the files folder only and the rest of the folders will also reflect the changes.
Connecting to the Vortexbox folder manually.
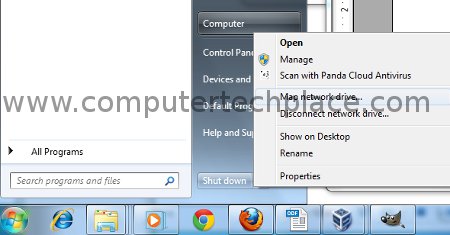
If you are so unlucky and the system refuses to mount all the Vortexbox folders by itself. You can still connect to it manually. Simply click “start menu” of the Windows OS, right click on “Computer” and choose “Map network drive”
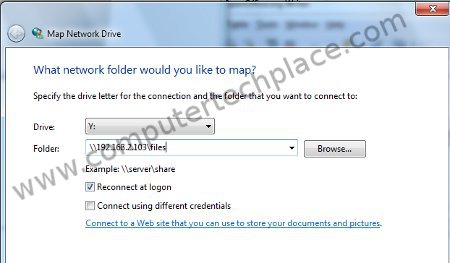
Replace the IP with your own shown in your Virtualbox interface. Now it will show up as one of the drives in your Windows OS for you to gain access and paste music files across.
There you go. I have showed you how to make use of the Vortexbox media software. I hope my guide is useful to readers out there. Oh, before I forget, in order to insert album art into the media server, simply Google search online for your image, resize it to a square image of around 200 x 200 pixels. Put that image in the same folder with the songs that belong to that album. Rename that image “Cover.jpg”. It will associate that image with the songs in the folder.
Attached Files


You Asshole.
Aus do you installiert fucking virus in your website?
Contacted Kaspersky to blacklist your site in their patterns.
And now fuck oft and die.
Comments from admin – I approved your message because I believe in freedom of speech. I hope whoever you are, if you are those who are trying to brute force hack into my site. I hope you do not continue. I am just an average IT guy. It is my passion to share what I know with the community. I do not earn much or even earn at all by running this site. Please go hack some website that is more worthy then a small web site like mine. Thank You.