Install Jolicloud And Run Off A Thumb Drive
![]() Installing Jolicloud and run off a thumb drive is a very useful concept, it means carrying the whole operating system with you. The computing world is changing, speed and convience is the way to go. Instead of using software that requires you to install before you can use, the future concept will be making use of apps.
Installing Jolicloud and run off a thumb drive is a very useful concept, it means carrying the whole operating system with you. The computing world is changing, speed and convience is the way to go. Instead of using software that requires you to install before you can use, the future concept will be making use of apps.
If you follow the guide via the official website, it will only create a bootable Jolicloud with a USB thumb drive. Trying to use Jolicloud in a thumb drive will be slow as hell. But my guide uses a different procedure so that using of Jolicloud on a thumb drive will be fast and responsive, booting up via thumb drive will be very fast.
Jolicloud is fantastic because it is a special version of Chrome OS that has a ton of hardware drivers compatible with almost every single major brand of computer out there. This amazing Jolicloud works right off the bat even if you boot it as a Live CD. Every single component of your laptop or computer ranging from sound to Wi-Fi will be functioning the moment the Jolicloud starts up. Installing it direct or running off a Live CD. I will focus on installing Jolicloud and run it off a thumb drive in this guide
Installing Jolicloud and run it off a thumb drive is not difficult, the tricky part is to be careful when Jolicloud decides to modify the partitions of the devices. You must be able to identify the correct partitions. Sometimes the installer will decide to write the boot loader to another drive. And this is dangerous, if you have an existing computer with Windows in it, you may have a whole system wreaked. Let me state some of the few options that I have tested.
You can install Jolicloud in the following manner
1. Use the Jolicloud installer.exe and install it inside of Windows, if you have Windows as the primary operating system. This concept works for multi-boot or even triple boot with Mac OS using GPT. Note, using the Jolicloud Live CD to install it along side with multi-boot operating systems screws up your whole partition and Jolicloud will fail to run.
2. Use the Jolicloud USB installer with Windows operating system if you intend to install Jolicloud to USB thumb drive.
3. Boot up via the bootable Live CD and install it of course
Most users, will find the thumb drive version of Jolicloud too slow at boot up. This drives people insane, but in this article, I will show you how to install Jolicloud into a thumb drive and it will boot up fast. Currently, I am trying to include an additional partition to be used as storage space, so that the thumb drive can still be used to transfer files in a Windows computer even though it has jolicloud installed
You will need a USB 2.0 thumb drive larger then 4 Gigs. Using a slow thumb drive will make the waiting time a real pain in the ass. For your information, an USB 2.0 thumb drive takes around 3 to 5 minutes to boot up. After booting up, using it is reasonably smooth. There will be some lag, but I believe it is manageable. But if you use my guide, all the lag will be barely noticeable. It will be fast and responsive.
You will need to download the Jolicloud iso file and burn it to a blank CD using iso burning software such as imgburn. After that, simply hook up the thumb drive and insert the Jolicloud CD into your CD drive and boot off it. You will see a boot menu which asks you if you wish to try or install Jolicloud . Choose install Jolicloud. The first few pages of the installation page is self explanatory. Be careful when you reach the partitioning page. This page is very crucial because in the event you make the wrong choice, you will install it directly onto your computer and it may result in a total screw up of your existing Windows OS.
There is an option that states that you can erase and use the whole drive. That is the option that you will need to choose. After that, as long as your thumb drive is hooked up and connected before you boot up the Jolicloud CD, you will get to click on the dropdown menu and choose your thumb drive.
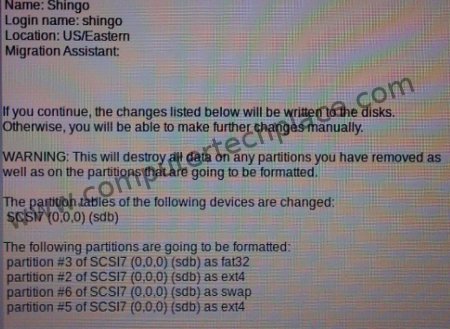
Choose use the entire drive and then select your thumb drive from the drop down menu. After that, select partition the drive manually. This is the part that is important. Create the partitions in the following manner. You may need to scroll down and ensure that you are modifying the correct drive
If required, click on a partition and select delete to make sure that the whole thumb drive reads as free space.
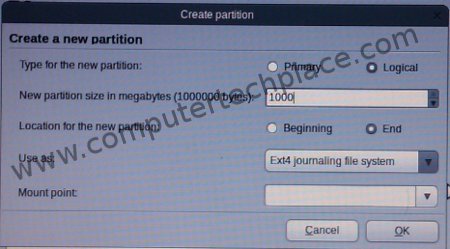
1. Click on the free space again, and add a Logical Ext 4 partition of 1Gig. Similarly, create it at the end of the drive. This partition is for the Jolicloud to be use as extra software space, or else jolicloud will be slow as hell.
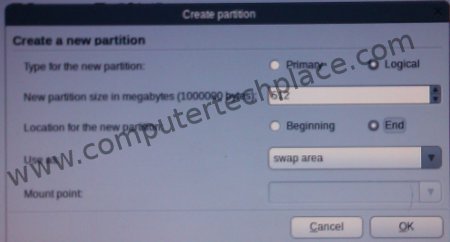
2. Click the free space and click add. Create a Logical Swap partiton with a side of 512 Meg at the end of the drive. This is the swap partition that is required of Jolicloud
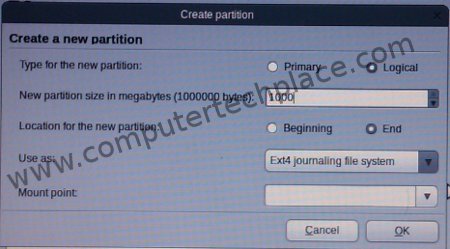
3. Click on the free space again and add a Logical Ext 4 partition of 4 Gigs at the end of the drive and choose / as the mount point. This is the partition for Jolicloud to install itself to
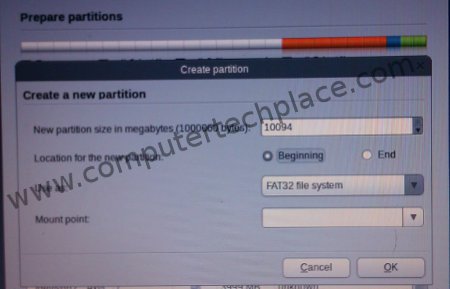
4. Click on the remainding free space and create a fat32 Primary partition. Note that this is the only Primary partition. The rest are logical partitions. This is the partition that you have deliberately set aside for Windows.
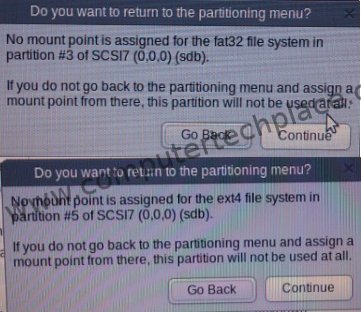
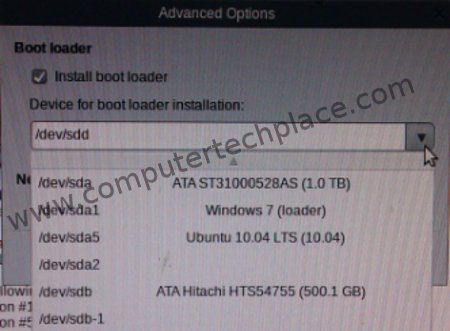
Click on forward and make sure that the bootloader is pointing correctly to the thumb drive. You will receive 2 warnings where by the first will state that the 1 Gig Ext 4 and the Fat 32 partition do not have any mount points and therefore will not be used. Ignore the warnings and just proceed.
It will take a while to be complete with the full installation because it is trying to install onto a thumb drive. Be patient Once the installation is complete, you can carry this thumb drive along and hook it up to any computer that supports booting from USB.
This part is also very important and you must not get too excited. Unless you have physically unplugged every single hard disk from your computer, you must check the “advance settings” to see if Jolicloud attempts to make any modification to any other hard disk except the thumb drive. You must be able to identify which is your thumb drive. First of all, before you choose to format the whole drive, take a look at the initial configuration of your partitions, where it will state all the Sda, etc.
Normally, the main hard disk will be called Sda, any additional hard disks will be called Sdb, Sdc and so on. If you checked the advance settings and realized that Jolicloud has an entry not pointing to the correct device. You must halt the installation immediately and attempt to figure out what that device is. It is best to unplug that device before you proceed with the installation. I highly advise users to unplug every single hard disk and USB hard disk from your computer before proceeding with the installation of Jolicloud into the thumb drive. This will prevent any possibility of accidental modification of partitions or bootloader to your existing hard drives.
If you follow my guide, the booting up of Jolicloud is a lot faster comapred to using the USB creator from Jolicloud themselves.
In the event you wish to reset the thumb drive to be used as a storage medium again, Download the HP Format Tool and it will be able to format the thumb drive for you. Quick format works fine and dandy.
Note that you must set the computer’s bios to boot off from USB if you intend to use the Jolicloud from the USB device.
After the first initial boot up, Jolicloud should work fine. Now you can use the thumb drive in Windows, and use Jolicloud as bootable Live disk. Is that cool or what. At this point in time, I am still figuring how to make use of the extra space to be converted as a partition so that the thumb drive can be used as a storage device as well. That is why there is a huge chunk of Fat32 partition lying around. Stay tuned, and I will keep you undated.

Leave a comment