Install A2SD HTC ChaCha

This guide works for other phones too. I followed a guide for Sony Xperia and I used it on HTC ChaCha. I have been using HTC ChaCha for quite a while and anyone who used HTC ChaCha will know that we love and hate the ChaCha. We love the qwerty keyboard but the lack of space for installing of apps kills the phone. I was reluantant to take the plunge to do extreme measures such as installing A2SD on the HTC ChaCha to make space for more apps, since it will require complex procedures like rooting to be done. But patience has a limit and I cannot take it anymore. Thus, here’s a guide on how to install A2SD on the HTC ChaCha.
Before you follow this guide, make sure that you have rooted your HTC ChaCHa. Please follow this guide on how to root your HTC ChaCha. You can use the app in this article without rooting, but it won’t make a difference if your device is not rooted. Rooted device will allow more complex apps to be moved across such as Whatsapp that take up a huge chunk of space.
Once you are sure that your device is rooted, lets proceed with installing of A2SD for HTC ChaCha I will make use of an app that is downloadable from the Google Play store. This is because A2SD is an app that requires you to make use of the Terminal commands, which in turn means you need to download lots of Android SDK packs, connect the phone to HTC Sync and all the work. In this guide, there is no need for so much hassle.
Step 1 – Install Link2SD app from the Google Play Store.
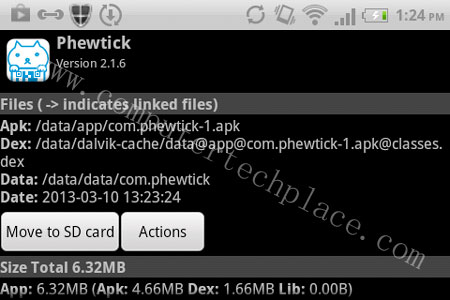
You will need to uninstall as much apps first if you encounter “insufficient storage space” error in your HTC ChaCha. Even though this app is only a few hundred kbs, God knows why, I need to uninstall, at least 2 apps that were around 5 to 6 meg, such as Whatsapp and Phewtick before I can install Link2SD. Don’t be sad, you can install back 200 apps later once you are done with this guide.
Step 2 – Ensure that the Link2SD app gets the root access.
For me, I almost tugged my hair out when I could not grant root access to the link2SD app. The Link2SD app keeps telling me that it is unable to get root access and the Super User app is not responding in the background. Yet it works when other apps wanted root access. Remember to check if your SU binarys are updated. Simply start the Super User app, scroll to the first page and tap on check updates. It may not work, for me the binarys failed to update anyway. 😛
After trying for like ages, I turned on “debugging mode” and the root access worked, like finally. Remember to reboot if the root access did not work before doing another attempt. Once you are sure that Link2SD is granted root access, lets partition our SD card.
Step 3 – Partitioning the SD card.
There are a few ways to do so. You can either remove the card and slot it into your card reader in your computer, download minitool partitioning software and create one ext2 partition at the end of your MicroSD card. Your choice on how big you want the ext2 partition to be. Remove your MicroSD card and insert it back. Or an easier way which is sure to work.
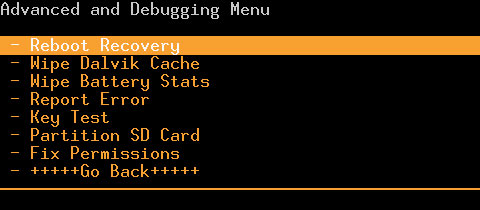
I assume you did root your device using my guide. If you do so, you will be able to enter the Clockworkmod menu. Shut down your HTC ChaCha. Turn it on and hold on to the volume down button You will enter the Hboot screen. Use the volume buttons to navigate to “recovery” . Press the “Power” button at the top to select the option. Using this orange clockworkmod screen. Go to “Advanced”, “Partition SD card.”
NOTE : Please make sure that the contents in the entire SD card has been backed up. The whole SD card will be wiped squeeky clean. You will lose everything. Copy it back after the partitioning has been done. You can choose between 4 sizes. That will be the size you will have for additional storage space. You can go all the way up to 2048 which is 2 Gigs worth of internal memory for your HTC ChaCHa. Woot.
But please take note, once you have partitioned the card, the amount of space you can use in the MicroSD card will be smaller. So assuming that you have a 4 Gigs SD card, making 2048 meg of partitioning means that you will only see a 2Gig card in your external storage after that. But you can always opt for a bigger MicroSD card. It will work too.
Once the partitioning is complete, reboot and get into the HTC ChaCha.
Step 4 – Setting up the Link2SD
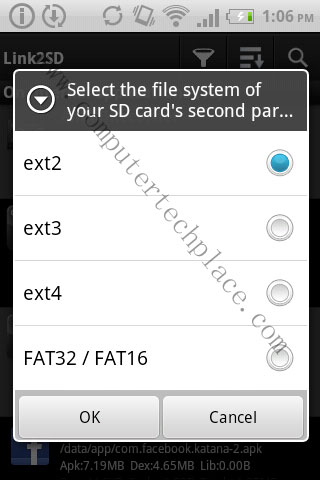
If you are able to get this far, this is the last stretch. Simply start the Link2SD app again and you will see a new menu which will ask you if you wish to choose between ext2, ext3 etc. Choose ext2 , and reboot. Works for me. If it fails, it probably means you did not partition correctly, or you can try other partition formats to see if it is going to work for you.
Using Link2SD, tap on the apps there and move as many apps as you like across to the SD card. Note that not all apps can be moved. Facebook did not work for me. The pros of transfering apps to the A2SD card is that you can download the entire Google Play store, cons will be that if you connect your phone to the computer as a thumb drive, all the apps will vanish all of a sudden. For instance, I cannot receive my Whatsapp when I am using my phone as a thumb drive.
I hope this article on how to Install A2SD HTC ChaCha is easy for all to follow. And download to your hearts content. Enjoy your HTC ChaCha my friends.


Leave a comment