How to install And Run Windows 8 Professional Inside a Thumb Drive
Running a Windows operating system on a thumb drive has always been a dream. The moment is finally here. In this guide, I will show you how to install and run Windows 8 professional inside a thumb drive. Take note that this is not the Windows to Go, but a full Desktop version of Windows 8 on a thumb drive.
In this guide, I used a 5400 rpm hard disk in a hard disk enclosure, connected via USB. The outcome was impressive. The whole operating system boots up within seconds and the use of it was as fluid as it should be. Just imagine the possibilities with USB 3.0 thumb drives. I will not go into some details that I consider as pretty much basics of computing. If you need me to elaborate on certain aspects in the guide, please let me know. You will need a minimum of 16 GB and above to proceed with the installation.
How to install And Run Windows 8 Professional Inside a Thumb Drive.
Step 1 – Install the Windows Automated Installation Kit
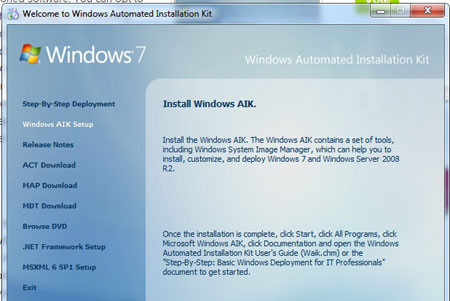
This is a piece of software that you need to download from Microsoft. It is around 1 Gig plus. It is in the form of an ISO file and therefore you will need to mount the file with softwares like Daemon tools or MagicDisc before you are able to see the contents. After mounting the Windows Automated Installation Kit. You will need to install it by double clicking on the StartCD.exe. Choose Windows AIK Setup.
Step 2 – Formatting the thumb drive / hard disk
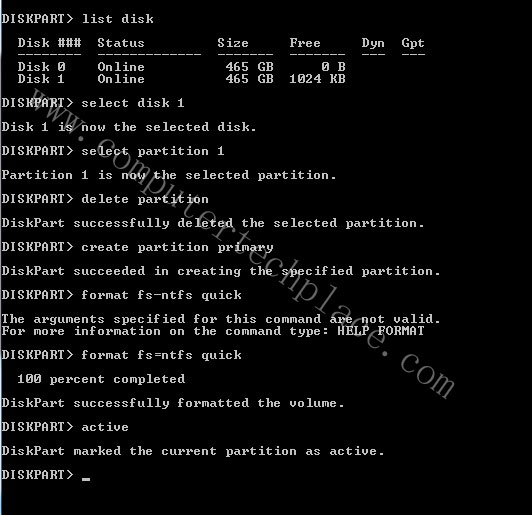
Press the “Windows Key” Type “cmd”, right click on the cmd and “run as administrator”. Type “diskpart” without the quotes and hit enter. Key in the commands as shown. If you are unsure which partition is the one in your computer, plug in the thumb drive, run the “list disk” command before and after pulling out the thumb drive to see which one disappears. Do not format the wrong drive or you will lose all your information in other drives.
Step 3 – Copying of files over to the thumb drive
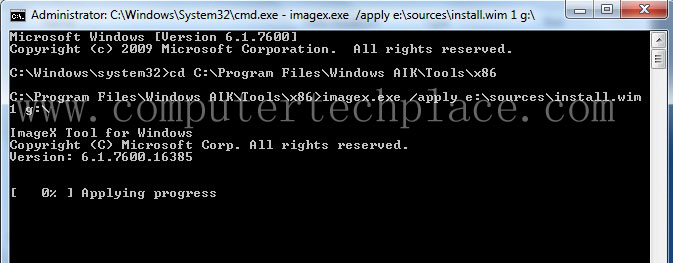
Once you have exited the disk part application are is back at the Dos Prompt, we can now proceed to execute a series of commands to copy Windows 8 files over to the thumb drive.
Key in the commands as follows
cd C:\Program Files\Windows AIK\Tools\x86
imagex.exe /apply f:\sources\install.wim 1 d:\
Note that the
f:\ = to the Windows 8 CD
d:\ = to the thumb drive that you are installing to.
(The drive may not show up after doing the Diskpart commands, use the Compmgmt.msc to assign a letter to your USB drive)
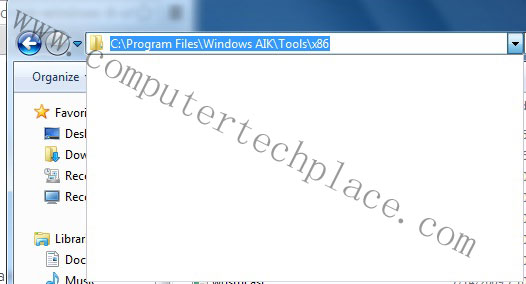
It will be easier if you locate the source on where your Windows Automated Installation Kit. It will be easier if you look for it using the Windows Explorer. Once you found the location, click on the drop down button and copy the whole thing as a whole. So the command can be pasted into the Dos prompt.
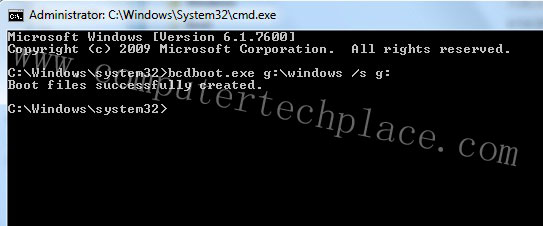
Once the copying is done, you will need to key in the next command to make the thumb drive bootable. The command is bcdboot.exe d:\windows /s d:
Note : d: is the drive where your thumb drive is.
For me, I ran into a problem where by I was unable to execute the command. This is because the copying of files took too long and the admin rights were lost. In that case, you will need to close the Dos prompt and run a fresh version of Command prompt with administrator rights.
Once the command is complete, you can proceed to load this Windows 8 from the thumb drive by booting off from USB. There were a few problems when I tried. The Windows 8 will always fail to sign in to a new Microsoft Live user account that I had tried to connect to. If that happens, simply skip everything, such as Wi-FI, connect to Microsoft Live and just create a normal user login. Set up the rest once you are in.
You will need to reboot a few times during the first boot up and that is normal. I hope this guide on how to install and run Windows 8 professional inside a thumb drive is useful. To me, it is a very good backup operating system to be stashed away and should the need arise, plug the thumb drive in and copy everything you need out before formatting the whole computer.


Leave a comment