Install Ubuntu HTC HD 2
 Recently I stumbled on a project on how to run Ubuntu off the HTC HD 2. To a lot of computer geeks out there running Ubuntu off the HTC HD 2 is not something very special. It works on the same principle on how you load an Android off from an SD card.
Please check out this guide on how to prepare you device to run Ubuntu. It is generally the same set of instructions except that you will download this Ubuntu.zip and extract is as a folder and have the folder placed in the SD card. Tap the haret.exe to start off Ubuntu.
There is however one huge significant advantage about running Ubuntu on the HTC HD 2 and that is you will get a full desktop computing environment then just a smartphone operating system. What’s more, you can even hook up USB devices like mouse and keyboard. Theoretically, you can hook up anything that is supported by Linux as long as that hardware is Linux capable.
For me running Ubuntu in HD 2 is useful. As a road warrior, I can find some spare time to do some typing while I am on the go. If I do not want to bring a netbook around since I use my mobile phone as a replacement to the desktop, it is very useful to quickly swap the operating system in my HD 2 to Ubuntu and use a mouse to surf and type on the on screen keyboard. If need be, you can always bring along a small flexible keyboard. One of the best news of all is th.at the computer geeks at XDA developers are working to create one “Ubuntu” release just for the HTC HD 2. It is not going to be a ported from something kind of build with a lot of bugs and issues.
Currently, not everything works, but XDA developers will be releasing newer builds as soon as they nailed some issues. In this guide I will focus on how to hook up keyboard and mouse onto the HTC HD 2 that is running Ubuntu. You can refer to the guides on how to install Android to install Ubuntu. They are exactly the same procedures and steps, like Android, you will copy the Linux folder over to the SD card. What is even better is that Ubuntu itself runs from a single folder and will not interfere with other Android builds. Therefore you can do a triple boot of Windows Mobile, Android and Ubuntu on a single device.
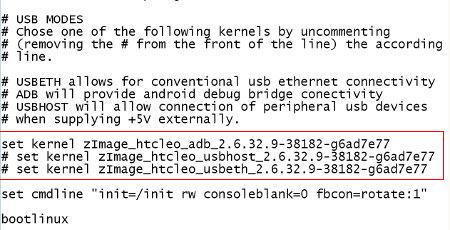
In order to start Ubuntu, all you need to do is navigate to the Linux folder in the SD card via Windows mobile or MagLDR and run the “haret-pre-0.5.3-20100629_092009-QSD8250-ONLY.exe” file, like any Android build. Linux should start loading and you will enter the Ubuntu desktop in less then a minute. Oh.. Did I mention the editing of the startup file? In this Ubuntu build version 0.3, you will need to choose between a few “Kernels”, in order words, simply means choose between a few functions. You can only opt to use either, a USB host function (allows you to hook up USB devices), an ADB mode (Android debugging mode) or USBeth ( allows internet tethering ).
You will need to choose between these modes before you start up Ubuntu. Use any text editor to edit the “startup.txt”. You will find this file in the Linux folder. You can do this editing using your HTC HD 2. Just go to Windows Mobile or Android and open the text file. Simply scroll all the way to the end. You will see the 3 lines before the last 2 lines.
set kernel zImage_htcleo_adb_2.6.32.9-38182-g6ad7e77
# set kernel zImage_htcleo_usbhost_2.6.32.9-38182-g6ad7e77
# set kernel zImage_htcleo_usbeth_2.6.32.9-38182-g6ad7e77
All you need to do is to remove one of the “#” from the 3 lines. Remember, you need to choose one, do not remove all 3 thinking that you can use all three at once. Those with the “#” will be disabled.
Now that assuming you have decided on what you want, and you have entered Ubuntu, you should be able to see a very nice graphical user interface with all the programs laid out in front of you. This is actually the “netbook remix” desktop of Ubuntu. From there will can navigate with your fingers by touching the screen. Play around with it to familiarize. I will now sort out the issue of those who may not be able to see any menu at all.
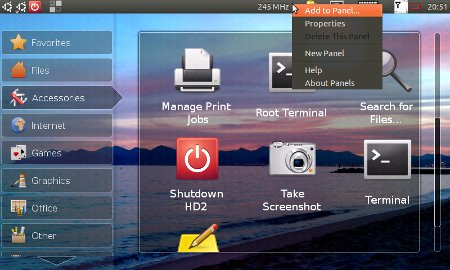
In version 0.3, the developers at XDA had already mentioned, it is very common not to see the menu at all. Thus you will need to opt for the menu list instead. Notice that on the top right hand side of the Ubuntu interface, you will see a few icons. The placement of those icons are as such, some icons all the way on the top left, followed by a blank mid portion and then some icons on the right. There is one icon which is the “battery indicator widget”, not the one that shows a flat battery, but the one with a wire. Notice that there is a very small space in between those icons on the right. Tap your finger somewhere to the right side of the CPU speed in between the battery meter icon on the top right and hold it for 3 seconds. Then release to display a menu. This actually emulates a right click “LOL… I know this calls for a sharp shooter accuracy” , other wise you can follow the guide on how to hook up keyboard and mouse below to make things a lot easier.
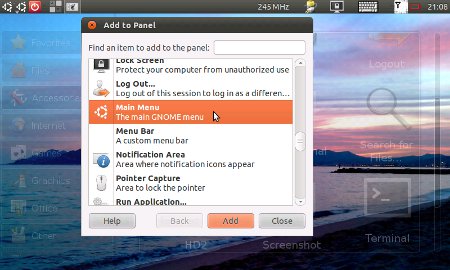
You will get a menu that will have a selection called “Add to Panel”. Select that and you will get a list of programs that you can add. Scroll down the list and look for the option, “Main Menu”. This will add and addition icon to the top left. The icon looks very similar to the one already there, but if you look closely, you will see that there is a small arrow at the bottom left of the new icon.
After adding the shortcut, you will get an extra icon on the top left hand corner of the screen which is actually the same thing menu that is supposed to display if nothing goes wrong. This icon will function just like our trusty Windows “Start Menu”. Otherwise, one alternative to force the menu out is to remove the battery and restart again and again until you get the graphical user desktop. “LOL” No worries, the geeks at XDA already promised that they will sort out this issue on the next version.
Enabling USB support
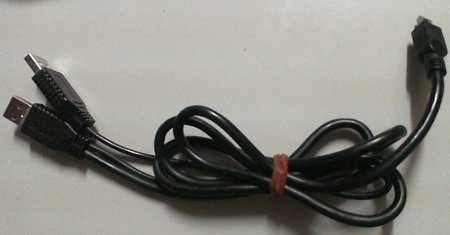
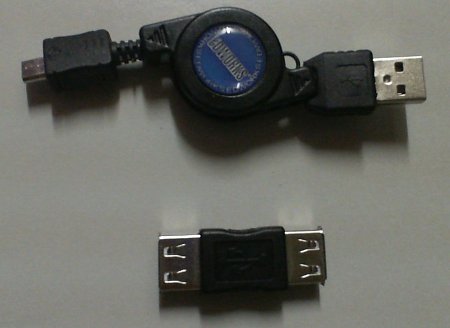
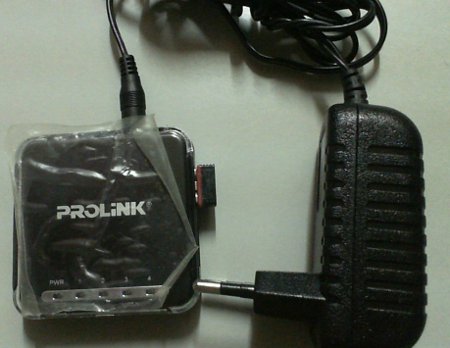
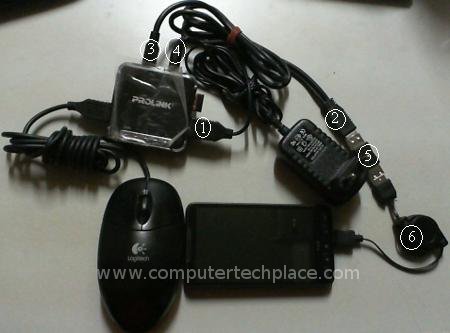
Note that you will need to edit the “startup.txt” to use the correct kernel or else the USB function will not work. There are quite a few ways to do it, but I will use my way as demonstration. You will need a USB hub that supports external power. A Y-USB cable, a “female USB to female USB” converter, a mini-micro USB to a normal USB cable. Check images for better understanding.
Use the “Y-USB cable” as the data cable to link with the HTC HD 2. The spare USB from the Y-USB cable will be connected back into one of the USB ports to get power. The other USB connector from the Y-USB stick will connect to your HTC HD 2. Supply power to the USB hub by connecting the A.C adapter supplied with your USB hub. Hook up your mouse and keyboard to the hub.
You can hook up this connection at any time, there is no need to hook up first before you enter Ubuntu, the only guide line is that the USB Hub must be powered at all times and your Y-USB stick must be drawing power from the USB hub.
You can also opt to hook up just a single device on its own, like a mouse or just a keyboard, or both the mouse and keyboard. In order to hook up just a single usb device, you will need a just the micro-usb cable and the USB extension connector. Simply connect the micro-usb to the phone and have one end of the Y-cable connected to a power source and the other end of the Y-cable connected to the mouse or keyboard via another USB extension connector.
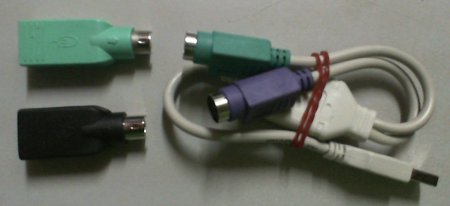
In order to connect both the keyboard and mouse together without going through a hub, you will need a special USB to PS/2 connector. Get the USB to PS/2 adapter for both your USB mouse and keyboard. If your keyboard or mouse is already a PS/2, then just use it on its own.
Below will be a full photo snapshot on how the connection should be connected.
1. USB connection of the Y-cable ( the one that does not provide data connection ) This one draws power off the hub
2. USB connection of the Y-cable ( the one that allows data connection )
3. USB connection of the Y-cable ( the one that allows data connection )
4. Power input to the USB Hub by use of power adapter or alternate means
5. The USB extension connector plug
6 The MicroUSB to normal USB cable. ( mine is retractable version)
There is no sequence as to which part needs to be connected first. The only issue to take note off is that the Hub must be powered before you connect the microUSB to the HTC HD 2. Or else nothing will be detected. I hope this article is interesting for computer geeks who wish to have something special as compared to others out there. Any questions don’t hesitate and I will try to answer them.

Leave a comment