USB Host Support Android ICS For HTC HD 2

There is an USB Host support for Android ICS For HTC HD 2, thanks to the outstanding developers in Xda forum. However the USB Host support for Android ICS For HTC HD 2 requires some manual installation instead of having it supported right out of the box. Since there is no official ICS rom for HTC HD 2. Most of the custom Android roms do not come with the USB Host support properties. In order to install this functionality, you will need to do it manually, unless the developer of the custom rom has already included it in the rom.
Step 1
Download the adb drivers pack
The adb drivers pack is something that allows you to communicate with your Android phone via Dos commands, Instead of the full version that you can download from Google, I have a smaller package that comes with just the important files. Extract the zip into a folder and put them in the C:\ . Name the folder adb drivers for example.
Step 2
Download the Android Commander
The Android Commander software allows you to take control of your device. Since we need to insert or copy some files across to the HTC HD 2. Download and install the Android Commander.
Step 3
Insert the USB Host files into the HTC HD 2
Download the HTC HD 2 ICS USB Host files in the form of a zip, extract the contents into a folder. You will notice that there are a few extra folders and files. Navigate to the System =>Lib => Modules. You are required to copy all these files across to your device.
Now, connect your HTC HD 2 to the computer via a USB cable. Go to “Settings” => “Developer Options” => “Android debugging”. This option must be checked. Run the Android Commander and the phone should be detected with no issues. Your device must be a rooted device in order for this process to be completed without hiccups. Having a rooted HTC HD 2 should not be an issue since custom Android roms will always be rooted.
If you make use of the Android Commander, simply use it like a Windows Explorer and copy the files directly across to the device.
In case you do not wish to use Android Commander, since Android Commander requires you to make use of a PC. You can transfer the files across too via the Android handset itself. Simply make use of an app called the Root Explorer. Even though this is a paid app, you can find copies of older versions on the web. Or if your device is compatible, you can try working with ES File Explorer first which is free. Both apps allow reading and copying of files right into the system portion of the Android device.
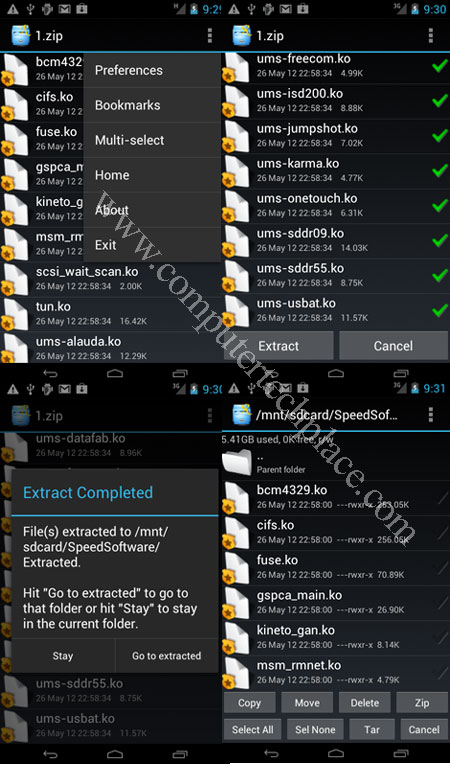
In this example, I will use Root Explorer as the example. First highlight all the modules from the downloaded archive and right click followed by “send to “ zip. This will create a zip file out of so many files so that you can transfer it across to the Android device. I know you can just copy all the module files across, but I do not know why, the module files will not show in my device at all. Even the folder that holds the files cannot be seen. Unless you can see them in your device, there is no need to pack it into a zip file.
From the Android device, using Root Explorer, tap the zip and view all the module files, use the multi-select feature to select all the modules and copy. Next navigate to the System =>Lib => Modules. Paste it. Done.
Step 4
Flash the HTC HD 2 ICS USB Host boot image
I assume you have a working Nand Android ICS rom running Clockworkmod. Reboot your device and hold on to the “back arrow” of your device. Your device will freeze at a prompt with some text. Connect your device to the computer via USB. You may see a prompt showing the Android adb device and it will ask you for drivers. For most users who have already been flashing Nand roms, you should not see any prompts. You should have already done this before. In case you receive that prompt, Go to Start\Control Panel\Device Manager and right click on “Android” and select update drivers. Then choose “Browse my computer for driver software” and navigate to the adb drivers folder where you extracted the files to and click next. It should be able to find the driver required. There will be no obvious changes after installing the adb drivers.
From the USB Host package that you have downloaded, look for a boot.img in the CLK folder. Copy that boot.img and paste it into the adb drivers folder. Put them together with whatever files there are.
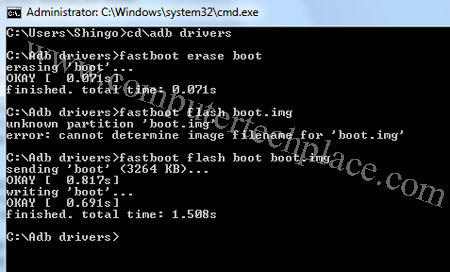
Press the “Windows Key + R” , key in cmd and hit enter to start the Dos prompt. Key in the following commands.
fastboot erase boot
fastboot flash boot boot.img
Restart you HTC HD 2 by pulling out the battery and putting it back. Now you will be able to connect USB keyboard and mouse. Check this guide on how to connect USB keyboard and mouse on an Android 4.0 device.
Since there is no actual USB Host support for the HTC HD 2, after flashing this boot.img, you will not be able to make use of the USB storage and the internet tethering function. But the Xda developers are working hard to compile a version that consists of all 3 modes.
For those who want a taste of this, you can follow this guide on how to get USB Host support for Android ICS For HTC HD 2. In order to get back the old functionality, simply flash your HTC HD 2 custom Android rom once again. All your files, bookmarks and apps will be intact.


Leave a comment