Install Android Gingerbread HTC HD 2

 Android Gingerbread 2.3 has just been released recently even though it is only to be due to arrive some time in the first quarter in 2011. The only device that is given priority to use the new Android Gingerbread 2.3 is the Google’s Samsung Nexus S which is also known as the Nexus 2. Thanks to the developers at XDA, they have extracted the Gingerbread operating system to be ported over to other smartphone devices. In this article, I will show you how to install Android Gingerbread 2.3 onto the HTC HD 2
The entire process is lengthy and might be intimidating to the less techie user, but I will describe the entire process in the easiest method possible so that anyone can understand and follow. Do note that readers of this article will have to exercise caution and read carefully before working on your device. All files and procedures in this article are only meant for HTC HD 2 and not for other devices. I will not be responsible for any damage to your device as a result of your actions.
Step 1
Check your SPL
Turn off your device first, press and hold on to the “volume down” button before you turn on the device. You will get to see a tri-colored display with some text. One of it will be listing your SPL. You will need to check that your device contains the following SPLs below
SPL 1.42.0000
SPL 1.62.0000
SPL 1.66.0000
SPL 2.07.0000
SPL 2.08.0000
Step 2
Crack your device with HSPL
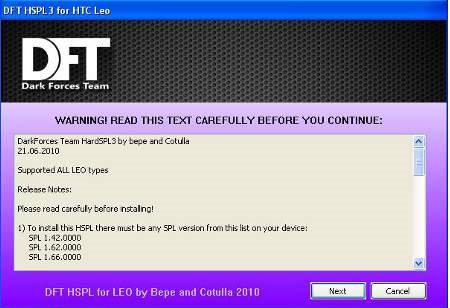
You can download HSPL 2 or HSPL 3 to crack your device with respect to the SPL values in your device. Installing of the HSPL is required so that an unsigned custom Windows mobile rom can be flashed into your device. Only by installing a specially modified Windows mobile rom into the device will you then be able to run Android on your device.
Step 3
Installing your custom Windows mobile rom
You will need to choose from a list of custom made roms that are reported to work with Android. Here’s the list of supported unsigned Windows mobile roms.
http://forum.xda-developers.com/showthread.php?t=661266
http://hotfile.com/list/701370/0d49ddf
http://forum.xda-developers.com/showthread.php?t=651729
http://forum.xda-developers.com/showthread.php?t=618787
http://forum.xda-developers.com/showthread.php?t=591784
Download a custom rom of your choice and extract it anywhere in the computer. You will need to allow the HTC HD 2 to be connected via the desktop computer via Activesync before you can flash the custom unsigned rom. Simply double click on the SoftwareUpgrade.exe to begin the flashing process of the Windows mobile rom.
Step 4
Upgrade the radio
Upgrading of the radio is required because the radio firmware is the thing that allows the operating system to make use of the hardware in the device to communicate and send data. Since Android and Windows mobile use different radios, we will need to choose a radio that happens to work with both operating systems. I use the Leo_RADIO_2.12.50.02_2.

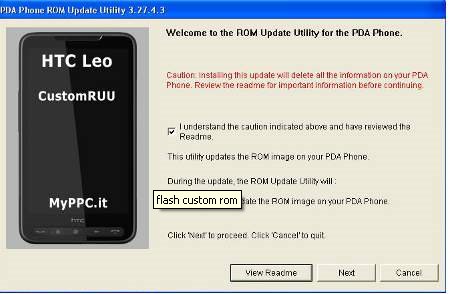
Similarly, download and extract the files anywhere in your computer and double click on the CustomRUU.exe file after your device is Activesync with the desktop computer.
Step 5
Format the SD card

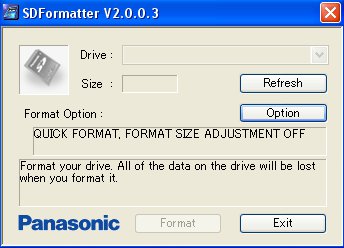
This step might not be required if you can start the Android. You can try formatting your SD card if you are unable to start up the Android. Download this Panasonic SD card formatting tool. Install it in your desktop PC. Take out the SD card from the HTC HD 2 and insert it into any card reader of the desktop PC. Run the Panasonic formatting program and it should detect the SD card. Format it. You can copy the Android files over to the SD card from a desktop PC or insert it into the smartphone and copy it across via Activesync
Step 6
Download your Android
Froyo build with Gingerbread mod
Download your Gingerbread here. Extract the zipped file and paste it as it is named and a single folder on its own onto the root of the SD card. It should be named “Ginger_hd2”, as it is and there is no need to rename it to Android or anything.
Gingerbread by MDJ XDA developers
http://www.multiupload.com/9ORGETZE2N [modded]
http://www.multiupload.com/PB72RK8XWW [stocked]
Gingerbread MDJ Gingerbread Ram build by m-deejay
http://www.filesonic.com/folder/0079ddda5600eaca6
This build is a newer and much more stable build by MDJ based on the 2.3 Gingerbread. It comes with a Windows Phone 7 theme which is totally awesome to play with. A few bugs on this build though. First you will need to avoid signing into your Google account via Gmail. Anyway, you won’t be able to do so, since the data connection is disabled by default. You will need to go and enable data mode in the settings manually yourself.
After that, you will need to sign in to “Google Talk” app first. After that, you will be able to download apps off the Android market without issues. Whenever you encounter problems in downloading of apps from the market, simply reboot and choose “Recovery”.
You must be able to sign in to Google Talk before the Android market will function correctly.
Step 7
Dual booting of Gingerbread and Windows mobile
This procedure is meant for the Froyo build with Gingerbread theme
For this build, it is slightly different. You will need to navigate manually to the folder itself via HTC HD 2. Tap on the CLRCAD.exe first, nothing will happen, followed by the haret.exe. Android will start booting. This is the very usual standard of launching off Android. After the first boot up, multiple files and folders will be created in the SD card. Reboot and enter Windows mobile, you will need to copy the files and folder from the “Ginger_hd2” folder onto the new “Android” folder in the SD card which was not there previously.
Install the Jmz dual boot program inside of Windows mobile and now everytime you turn on the device, you will get a boot menu to choose between Windows or Android.
Step 7.1
Booting up of the Gingerbread build from MDJ
You will need to copy and paste the files to a folder named Android. Then copy one of the data.img from one of the 3 folders, 256, 512 or 1024 and paste it into the Android folder. Allow it to do a first boot. After which enter Windows mobile to delete the AndroidApps folder from Android folder on your SD card.
Job done and now you have a Gingerbread and Windows dual boot running on your HTC HD 2. I hope all readers enjoyed this article on installing Android Gingerbread onto HTC HD 2.


Good site! I actually love how it is easy on my eyes as well as the details are well composed. I am wondering how I might be notified whenever a new post was been made. I have subscribed to your rss feed which really should work! Have a good day!
This Financial Advice I read on Google From your website I Found Very Helpful thanks For the Nice tips Looking Forward To Reading More From You !!
Excellent piece of writing, l quite agree with your submission. I will subscribe to your rss to keep up.